
How to Check a Disk from Windows
Running the Check Disk tool from the Windows desktop is easy. In File Explorer, right-click the drive you want to check, and then choose “Properties.”
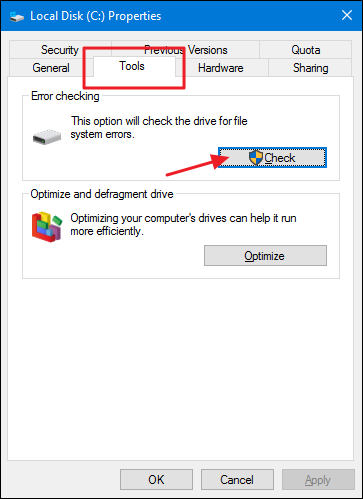
In the properties window, switch to the “Tools” tab and then click the “Check” button. In Windows 7, the button is named “Check now.”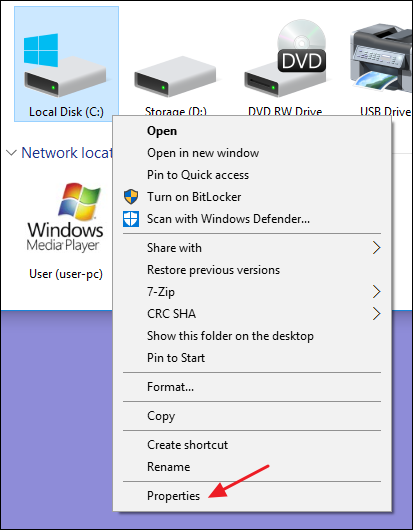
How to Use the ChkDsk Command at the Command Prompt
If you’re willing to use the Command Prompt (or you have to because Windows won’t boot properly), you can exert a little more control over the disk checking process. Plus, if you’re using Windows 8 or 10, it’s the only way to force automatic fixing or bad sector scanning into the mix. Open up the Command Prompt with administrative privileges by hitting Windows+X and selecting “Command Prompt (Admin).” You’ll be using the chkdsk command. The command supports a number of optional switches, but we’re mostly concerned with two of them: /f and /r .
If you just use the chkdsk command by itself, it will scan your drive in read-only mode, reporting errors but not attempting to repair them. For this reason, it can usually run without having to restart your PC.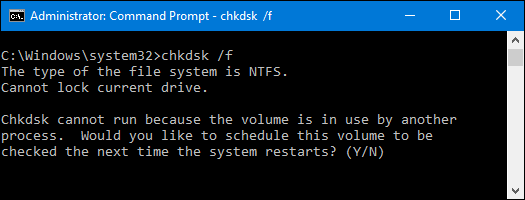
CHKDSK [volume[[path]filename]]] [/F] [/V] [/R] [/X] [/I] [/C] [/L[:size]] [/B]
volume Specifies the drive letter (followed by a colon), mount point, or volume name.
filename FAT/FAT32 only: Specifies the files to check for fragmentation.
/F Fixes errors on the disk.
/V On FAT/FAT32: Displays the full path and name of every file on the disk.
On NTFS: Displays cleanup messages if any.
/R Locates bad sectors and recovers readable information (implies /F).
/L:size NTFS only: Changes the log file size to the specified number of kilobytes. If size is not specified, displays current size.
/X Forces the volume to dismount first if necessary. All opened handles to the volume would then be invalid (implies /F).
/I NTFS only: Performs a less vigorous check of index entries.
/C NTFS only: Skips checking of cycles within the folder structure.
/B NTFS only: Re-evaluates bad clusters on the volume (implies /R)